

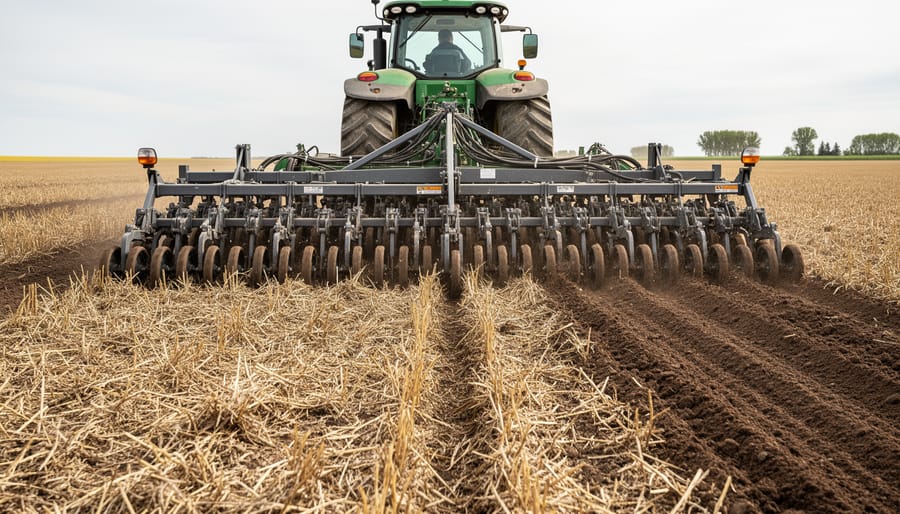
No-till farming is the practice of seeding crops directly into unplowed stubble, leaving the soil structure intact while crop residue protects the surface. On Prairie land, this method eliminates tillage passes, cuts fuel costs by 50 to 70 percent per acre, and improves water infiltration by maintaining soil pore networks that would otherwise collapse under conventional cultivation. Alberta producers need a direct seeding drill, a weed management plan that replaces mechanical control with herbicide or cover-crop suppression, and patience during the two- to three-year transition as soil biology rebuilds.
Across Canada, 60 percent of seeded cropland now uses no-till, with adoption concentrated in the Prairies where wind erosion and moisture conservation drive interest. Early adopters reported immediate savings on diesel and equipment wear, though weed pressure and residue management demanded new strategies. The shift from plowing to direct seeding isn’t just an equipment swap. It rebuilds the foundation of soil health basics by protecting organic matter, microbial networks, and the aggregates that hold water during drought.
This guide walks through the tools, the process, and the checks that confirm your system is working. Whether you’re converting a quarter-section or a full township, the steps remain consistent: choose the right drill, establish a seeding sequence, monitor for compaction and weed shifts, and adjust inputs as soil function improves. Local experience proves the practice scales from small diversified farms to commercial grain operations, provided you match equipment to residue load and commit to learning what your soil needs when you stop turning it over.
What You’ll Need: Equipment and Resources for No Till Farming
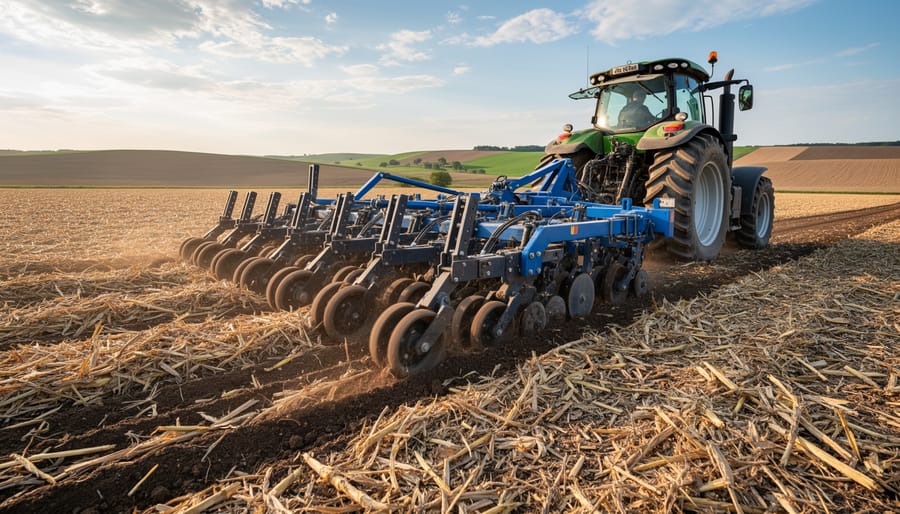
Making the switch to no-till means rethinking your equipment lineup. You don’t need to overhaul everything at once, but certain tools are essential for establishing and maintaining a successful no-till system on your Alberta operation.
The cornerstone is a quality no-till planter or seeder designed to cut through residue and place seed at precise depths without disturbing the soil profile. These units feature coulters or disc openers that slice through crop residue, create a narrow seed trench, and close it firmly to ensure seed-to-soil contact. Look for models with individual row-unit pressure adjustments, since soil conditions can vary across a field even without tillage.
- No-till planter with coulters or disc openers for cutting through residue and placing seed at controlled depths
- Front-mounted cover crop roller for terminating hairy vetch and other cover crops mechanically in a single pass
- Residue management attachments to handle heavy crop residue and prevent plugging during seeding
- Precision depth control systems to maintain consistent seed placement across varying field conditions
- Row cleaners or closing wheels to manage straw management and ensure proper seed coverage
A front-mounted roller becomes critical when you’re using cover crops as part of your rotation. These rollers terminate standing cover crops like hairy vetch by crimping stems, allowing you to kill the crop and seed in one pass. This approach eliminates an extra trip across the field and keeps the protective residue layer intact on the soil surface.
Residue management attachments help move heavy crop residue away from the seed row just enough to allow for proper germination without creating bare soil. Row cleaners, finger wheels, or trash whippers keep the seeding path clear while leaving most residue undisturbed between rows.
The investment can feel substantial, especially if you’re coming from a conventional tillage system. However, many Alberta producers start small, converting one field or a portion of their acreage to test equipment and refine their approach. Equipment-sharing arrangements with neighbours are increasingly common across the Prairies, particularly for specialized tools like cover crop rollers that may only be used once per season. Local agricultural societies and producer groups can connect you with farmers willing to share equipment or provide hands-on guidance as you build your no-till toolkit.
Before You Begin: Important Considerations and Cautions
Switching to no-till isn’t a flip-the-switch decision. Alberta producers who’ve made the jump report that success hinges on patience, planning, and understanding what can go wrong during the first few seasons.
The biggest trap is expecting your soil to behave the same way on day one. Years of conventional tillage have altered soil structure, microbial communities, and drainage patterns. When you stop disturbing the ground, compaction can initially worsen in the top few inches, especially if you run heavy equipment on wet spring soil. Alberta’s variable weather makes timing critical. Seeding into cool, wet conditions without the warming effect of tillage can delay emergence and leave you staring at uneven stands.
Start small. Test no-till on a field or two rather than converting your entire operation at once. This gradual approach lets you learn how your specific soil type responds, fine-tune planter adjustments, and develop new management instincts without betting the whole farm. Some fields aren’t good candidates, heavily compacted ground, poorly drained sites, or areas with severe perennial weed pressure may need remediation before no-till makes sense.
Yields can dip slightly in year one as the system finds its footing. Early adopters who emphasized improved water infiltration and storage saw those benefits build over time, not overnight. Set realistic expectations, keep detailed records, and connect with other Alberta growers who’ve walked this path. Their experience will help you avoid costly mistakes and recognize which challenges are normal growing pains versus signs you need to adjust your approach.
Step-by-Step: Implementing Your No Till Farming System
Step 1: Establish Your Cover Crop System
Your cover crop stand forms the foundation of a successful no-till system. In Alberta’s climate, you’re working with a shorter growing season than many no-till guides assume, so timing matters from day one.
Start by choosing species that fit your rotation and termination window. Hairy vetch works well across the Prairies because it fixes nitrogen, establishes quickly, and responds reliably to roller termination. For most Alberta zones, seed hairy vetch at 20-30 pounds per acre in late summer or early fall, early enough to get 4-6 inches of growth before freeze-up. Spring seeding works too, but you’ll need 60-70 days of growth before termination to get the biomass and nitrogen fixation you’re after.
Seed into a firm seedbed at half to three-quarters of an inch deep. Shallow placement speeds emergence, and a cultipacker or light harrow pass after seeding improves seed-to-soil contact without burying the seed too deep. If you’re drilling into stubble from the previous crop, set your opener pressure light to avoid disturbing more soil than necessary.
Monitor the stand through fall and again at green-up. You want even coverage across the field, gaps mean exposed soil and reduced residue for the planter to work through. A healthy stand shows vigorous leaf growth, dense ground cover, and visible nodulation on the roots by late spring. That’s your signal the system is cycling nitrogen and building the mat you’ll terminate in the next step.
Step 2: Terminate the Cover Crop
Timing your cover crop termination correctly makes the difference between a smooth seeding pass and a frustrating struggle with regrowth. For hairy vetch killed by roller you’re aiming for the flowering stage when stems become pithy and less likely to resprout. At this point, the plant has accumulated peak biomass for soil coverage but hasn’t yet set seed that could create volunteer problems next season.
The front-mounted roller approach fits naturally into no till systems because it lets you terminate and seed in a single pass. The roller crimps stems ahead of the tractor while your no-till planter follows immediately behind, dropping seed into the freshly terminated mat. This timing matters in Alberta’s climate, you want soil temperatures warm enough for germination but early enough to capture spring moisture.
- Walk your field when vetch reaches 10-20% bloom; check stem thickness at the base by attempting to snap one with your fingers.
- Set the roller to crimp every few inches along the stem length, creating multiple crush points that prevent regrowth.
- Roll when conditions are slightly damp but not wet; stems crimp cleanly without bouncing back when tissues hold some moisture.
- Follow with your no-till planter in the same pass, adjusting depth to ensure seed contacts soil through the residue mat.
Verification is straightforward. Return three to five days after rolling and inspect a dozen random stems across the field. Properly terminated vetch shows browning tissue, wilted leaves, and no signs of green regrowth from nodes. If you spot vigorous green shoots pushing through crimp points, your timing was early or roller pressure insufficient, lessons that refine your approach for next season rather than reasons to abandon the practice.
Step 3: Direct Seed with Your No-Till Planter
With the cover crop terminated and lying on the surface, you’re ready to seed directly into the residue. Timing matters here, plant as soon as the roller pass is complete so the cover crop mulch doesn’t dry out and interfere with seed placement.
Set your planter depth carefully. In Alberta soils, aim for consistent depth that places seed just below the residue layer into firm soil contact. Start shallow, around three-quarters to one inch for most crops, and adjust based on emergence. Run test strips before committing to the full field.
Managing residue flow is critical. Your no-till planter’s row cleaners or coulters need to move the terminated cover crop just enough to create a narrow seeding slot without disturbing the surrounding soil. Watch for hair-pinning, where residue gets pushed into the furrow and prevents seed-to-soil contact. If you see poor emergence in patches, check whether residue is bunching or bridging over the opener.
Monitor your seeding pass closely those first few acres. Stop periodically to dig up seeds and verify placement, you should see each seed nestled against moist soil, not suspended in loose residue or floating in an air pocket. Adjust down pressure, closing wheel tension, and opener angle as needed. Alberta’s spring conditions vary, so what worked last year may need tweaking.
Keep your speed consistent, typically slower than conventional seeding. Rushing compromises depth control and residue handling, both of which determine whether your crop emerges evenly or struggles.
Step 4: Monitor Water Infiltration and Storage
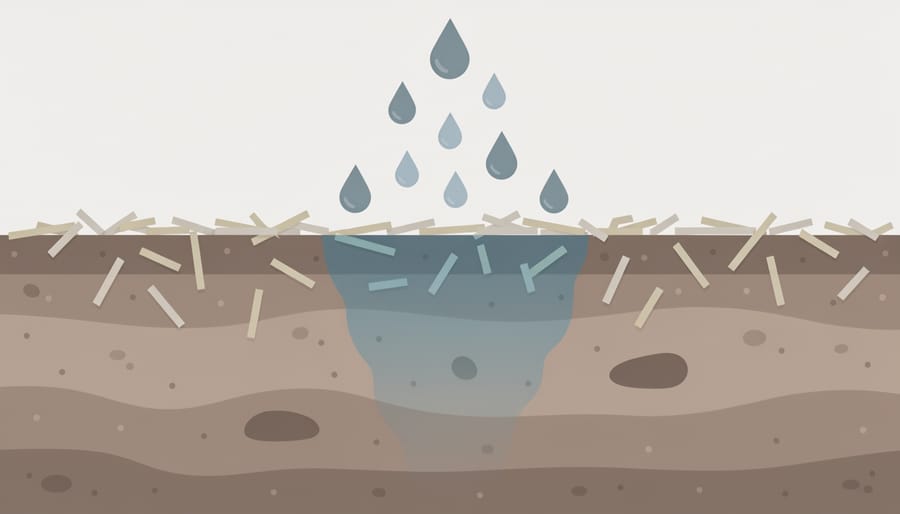
One of the clearest signs your no-till system is working comes from watching how quickly water enters the soil during rainfall. Early adopters of no-till farming in the Prairies emphasized increased water infiltration and storage as a primary benefit, and you can verify this improvement through straightforward field observations throughout the growing season.
Start by comparing how water behaves in your no-till fields versus conventionally tilled areas during and after rain events. In established no-till systems, no-till improves infiltration rates, meaning rainfall penetrates the soil surface more rapidly rather than running off or pooling. Walk your fields within a few hours of significant rainfall and note where water stands versus where it has already soaked in. As Alberta soil dries-up during hot periods, fields with better infiltration maintain moisture deeper in the profile.
A simple penetration test using a metal rod or soil probe also reveals storage capacity. Push the probe into the soil at several spots across the field, noting depth before hitting resistance. In functional no-till systems, the probe should slide easily through the top several inches, indicating loose, porous soil structure that holds water. Compare this to harder, compacted zones where tillage may have been used recently.
Track these observations monthly during the growing season, especially after heavy rain. Documenting improvements in how quickly water enters and how long moisture persists validates that your system is building the resilience that made no-till the dominant practice across 60% of Canadian seeded land.
Checking Your Success: Verification and Next Steps
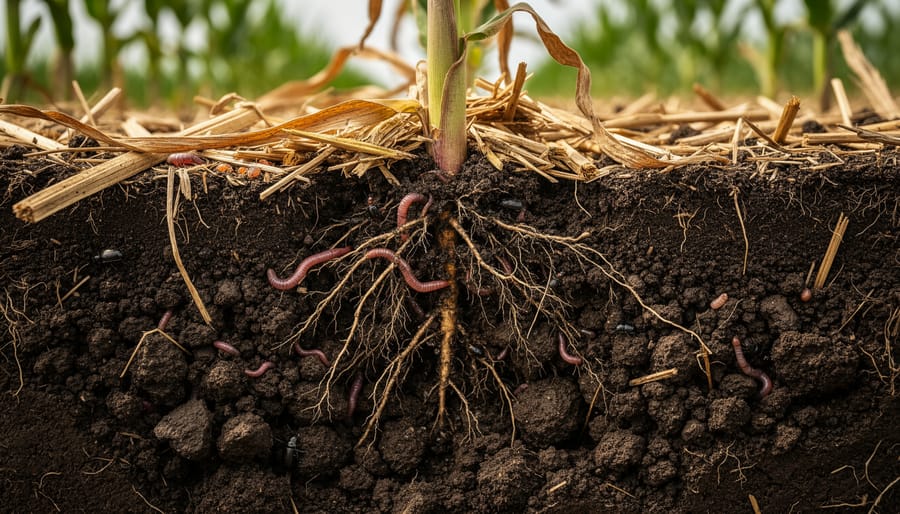
You’ll know your no-till system is working when you can measure clear changes in soil behavior and crop performance. Start by digging into the soil with a spade, look for visible aggregation, root channels that persist from previous crops, and a crumbly structure that breaks along natural planes rather than turning into dust. Check for earthworm activity during early morning field walks; healthy no-till soils typically support five to ten earthworms per spade-full, a sign that biological processes are replacing mechanical disturbance.
Monitor these key indicators throughout your first two growing seasons:
- Water infiltration rate, dig a small test pit after a rain event and observe how quickly pooled water disappears
- Crop emergence uniformity, walk transects and count plants to verify consistent seed-to-soil contact
- Residue cover percentage, aim for at least 30% surface residue remaining after seeding
- Soil temperature trends, track whether no-till fields warm more slowly in spring, which may require planting date adjustments
- Compaction zones, probe for hardpan layers that indicate traffic pattern problems
If crop emergence looks patchy or water pools on the surface, adjust your planter depth settings or residue management before the next season. Some Alberta producers find that switching from wide row spacing to narrower configurations improves early canopy closure and weed suppression. Others discover that their roller timing needs refinement, terminating cover crops a few days earlier or later can make a significant difference in residue decomposition rates.
Connect with other no-till practitioners through your local agricultural extension office or conservation district meetings. Many Alberta counties host field days where experienced growers demonstrate their systems and share equipment modifications that worked for their soil types. These relationships become invaluable when you’re troubleshooting an unexpected challenge or deciding whether to invest in a new attachment. Your no-till system will align more closely with the 5 soil health principles with each season, building resilience that pays off during drought years and heavy rainfall alike.
Common Questions About No Till Farming in Alberta
Do I need to use more herbicides with no-till farming?
No-till systems do rely on herbicides for weed control since you’re not mechanically disturbing the soil, but many Alberta producers find their herbicide costs stabilize after the first few years as the weed seed bank depletes. Consider the broader picture of pesticides and the environment when planning your management approach, and work with your agronomist to develop a rotation that minimizes reliance on any single control method.
Can I use my existing seeder for no-till farming?
Most conventional seeders need modifications to handle surface residue and maintain proper seed depth in untilled soil. You’ll likely need to add residue management attachments, upgrade your depth control system, and possibly increase down pressure on the openers. Some Alberta producers start by renting or borrowing a dedicated no-till unit before committing to a purchase.
How does no-till affect my crop rotation?
Your rotation principles stay the same, but you gain more flexibility because you’re not limited by tillage timing or soil conditions for field work. Many Alberta no-tillers find they can plant earlier in spring since they’re not waiting for soil to dry enough to work, and the improved water infiltration from conservation tillage practices helps mitigate drought stress across all crops in the rotation.
What if no-till doesn’t work on my farm?
Not every field transitions smoothly, especially if you’re dealing with severe compaction or drainage issues. Conservation tillage practices exist on a spectrum, and reduced-tillage approaches might suit your operation better than pure no-till. The key is minimizing soil disturbance where possible while addressing specific field limitations, and many successful Prairie producers use a mix of methods across different fields.
The shift to no-till represents a long-term investment in soil health rather than a quick fix. Early adopters emphasized increased water infiltration and storage as primary benefits, and those advantages compound over time as soil structure improves. Some producers see immediate gains in fuel and labor savings, while others experience a learning curve with residue management and seeding adjustments.
Don’t expect perfect results in year one. The system needs time to stabilize, and your management skills will sharpen with each season. Connect with other Alberta no-tillers through local conservation groups or field days to learn what’s working in your area. The fact that no-till and reduced-tillage farming eventually became the main cropping system in the Prairies, with 60% of total land in Canada prepared for seeding now using no-till methods, shows this approach works for producers who stick with it and adapt the system to their specific conditions.
No-till farming has earned its place as the main cropping system across the Prairies because it works. With 60% of Canadian seeded land now under no-till management, Alberta producers aren’t experimenting, they’re joining a proven community of practice. The transition takes patience and adjustment, but farmers who made the shift decades ago emphasized the real gains: better water infiltration, healthier soil structure, and operations built to last.
You don’t need to overhaul everything at once. Start with one field, connect with neighbours who’ve walked this path, and give yourself a couple of seasons to learn what your land needs. Alberta’s agricultural network offers field days, producer groups, and shared knowledge that make the learning curve manageable.
View this as an investment in your farm’s future. The equipment, the cover crops, the new routines, they all pay forward into soil that holds more water, handles drought better, and supports stronger yields over time. No-till isn’t just a technique; it’s a commitment to resilience that Alberta’s farming community continues to prove out, season after season.